Showing posts with label craft for kids. Show all posts

Tuesday, January 10, 2012

a dancing dragon project for CNY


My 5-yr-old attends a cooperative preschool which means, among other duties, I work there one day each week. Parent-created projects are a staple of co-op life.

In honor of the rapidly approaching lunar new year, I've pulled out my trusty dragon head & tail and prepared to make paper accordion-bodied dragons with the kids. I did this project a couple years back with my older daughter's class. It's easy prep for the parent, always seems well-received by the kids and a great way to introduce a cultural celebration that might just be new to many of the kids. So draw up a dragon head and tail and give it a go.

I printed heads & tails on card stock.

strips of paper, craft sticks & bells to help the dragons scare off any bad juju
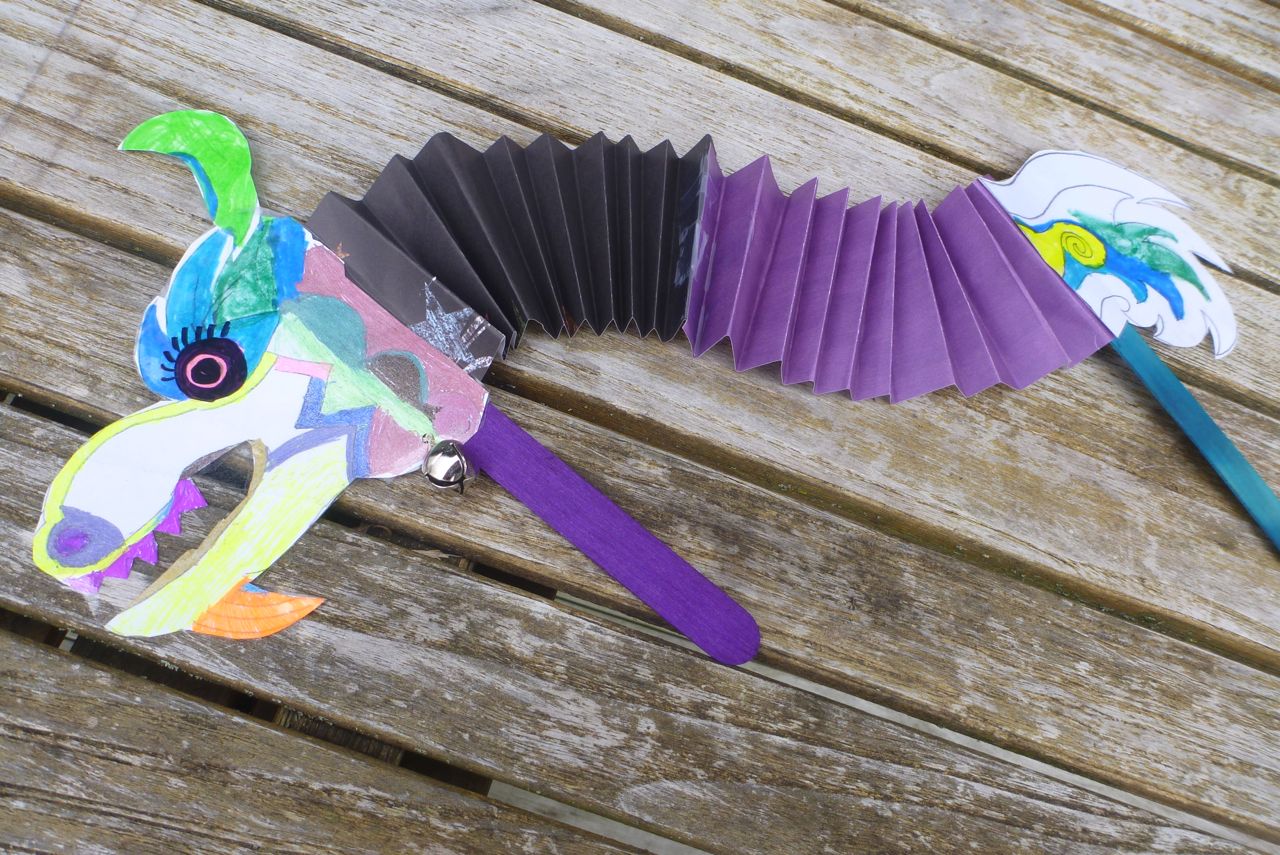
folding the accordion body is great for those fine motor skills. Iris
made this one to show her classmates when we introduce the project.

the accordion body allows for great movement

Friday, December 23, 2011

night-light boxes wrapped and ready


like the soft glow of candle light

We finished up our gift preparations - including prizes for the winning Pictionary team - and will soon be ready for family tomorrow afternoon. All of our light-boxes are under the tree. Iris gave away the first light box the other weekend for her friend's birthday. He loves giraffes, his color is pink and apparently he does strongly prefer a night light to the alternative darkness.


I think I missed photographing a couple. The best part was deciding a theme for each box to best suit its recipient.


Monday, November 21, 2011

holiday gift crafting: night-light boxes


The kids are home for the week and a bit sickly. Low energy and colds made for moderate crankiness - for the three of us - followed by bursts of house-bound craziness. After dragging them to a teacher conference this morning, watching a movie, a bit of de-cluttering, and some general mess-making and puttering around the house, I got us rolling on the gifts we plan to give to our company this Christmas.

We like to make sure everyone who joins us for Christmas dinner or brunch receives at least one handmade gift from "us". It's a collaborative effort between the kids and me - and my husband when the project requires carpentry skills. Once we've decided upon a project or two I let them make as many of the design decisions as possible while I bite my tongue and mostly go with their choices.

This year we've opted for night-light boxes featuring a variety of papercut silhouettes, plus plenty of ribbon and miscellaneous adornment.

Our supply list looks something like this:
Cradled wood panels - each with hole cut out of back for tea light placement (my husband made ours using plywood and other wood scraps).
Tea lights
Light colored paper, light weight paper on which to adhere silhouette designs. We're using a delicate white hand-made, highly textured paper
Card stock in dark color for silhouettes
Paper cutting blade to cut out silhouettes
Translucent vellum paper to layer on top of other paper w/silhouette (a protective layer)
Print-outs of clip art silhouette images, or make your own
Tape (to hold down paper as you cut out silhouettes)
Double-sided tape (an easy, fast way to adhere ribbon and paper is you don't have the proper glue on hand.
Glue
Ribbon
Tissue paper, or other decorative paper (old maps work well), to cover wooden box
Modge Podge & paintbrush


Our boxes (wooden panels) are 6" square with 3/4" sides, thus 4.5" of open space to serve as the lighted viewing window.

I prefer velvets, velour, gross grain, lace and other textured ribbon options.

I've never done paper cuts before, but this basic blade seemed to work fairly well.


Picked up an 8-pack of tea lights and brought out my photo/scrap-booking blue and double-sided tape .

We were pleased with the result of our tester box so the girls each designed their own. They Modge Podge'd tissue paper over their boxes first. I tried to dissuade my youngest from the hot pink ribbon she fell in love with, as I had really wanted to experience a hot pink free project. My plea was ignored. So here's what we've got so far...


This is the test box. I covered this box with some old aqua and metallic bird cage paper I had on hand.

No problem changing out the tea light if needed. Packaging indicates we
should get 100 hours out of each light.

Illuminated on the dresser. This is the effect we were hoping for.

A centaur-ess for my 8-yr-old. Powerful and magical suits her well.

She used a couple shades of blue tissue paper to mostly cover her
box. And the vellum paper is pale blue.

I anticipated either a cat or horse theme for my youngest. It
really does look just like one of our kitties. While the extras on
this one may be a little much for me, when it comes to my girl
there ain't no such thing.

Magenta, pink & lavender velvety ribbon on top of her beloved
hot pink/magenta ribbon. Pale blue vellum paper on this one
as well.

Haven't yet tried theirs out in the dark, as I did some final glueing
after they went to bed. Construction of the remaining 7 or 8 boxes
may be a couple of weeks out. Expect an update.

Tuesday, November 8, 2011

recently overheard...

My 5-yr-old and a 6-yr-old neighbor were recently playing. He was watching her draw for a moment. I don't know that I remember the exchange verbatim, but it went much like this:

Him: That doesn't look like a horse.

Her: Hasn't your Mom ever told you that people can draw things differently?

Him: No.

Her: Well, do you have an artistic license?

Him: No.

Her: I do. You know what that is? It means that I am the artist so I can make my drawings and things however I want. Because I am the artist.


Kuddos to you my little artist! We're going to turn this into a class project at preschool. I plan to photograph the kids and make them their own artistic or creative license. Each child will sign his/hers after taking an oath which I have yet to write, then we'll laminate them. I think it's the laminating part that makes it official.

Friday, August 5, 2011

crafty kids...and another dragon

The products of a morning sewing session with my 8-yr-old and her friend...

a mini ticky-tacky doll for a doll.


an ever functional cross-torso bag.


because dragons are magical.


Wednesday, December 22, 2010

the last of the Christmas crafting

In preparation for our Christmas guests, the girls and I have been crafting an assortment of gifts. Generally, our projects get off track as each child goes in her own direction and I do the same. When we finally got to our spool friends project, I insisted on paint base coats first. My youngest mixed an array of "people colors" for the heads. Next, I painted some solid body colors. I've learned from painting projects in the past that each child is always happier with the end result when they first do a base coat.

We used tooth picks for facial features (worked beautifully) and then pipe cleaners for the hair. The part I most enjoyed was giving our friends names and creating back stories. Enzo is a bicycle mechanic. Hisavette is a singer and dancer (she was born to entertain) who is known to take in any stray animal in need of lovin'. Florence (aka "Flo") - you guessed it - is a waitress. Deiter is in graphic design.

I get to keep one. Each was a collaborative effort between at least 2 of us. Next, we decide who each one goes to. My Dad definitely gets "Bob Loblaw", the lawyer, because we agree is will be fun to hear Grandpa read his new little buddy's name aloud. ;)

Madelinka, my favorite

Rapunzel, possession of my 4-yr-old. No one else need touch her!

some of the crew


the boys

Thursday, December 16, 2010

An easy kid craft with dramatic effect

You may have encountered this paper snowflake/star at your child's school or in a paperie display window. It's far easier than it might look at a glance, although my 4-yr-old needs a bit of help on this one.


Step 1
Begin with a square sheet of paper of any size. My example is 12"x 12"as that is what my daughter chose to use and it's what we had at the ready. I prefer a smaller size, say 8"x 8".

Step 2
Fold on the diagonal once. And then once again.

Step 3
Hold your folded triangle up with the longest side vertical. Make several cuts (4 is a good number) upward, parallel to the longest side but not all the way through the top edge of the paper.

When unfolded, you should have a diamond-like cut pattern like this.

Step 4
Time to staple, tape or glue. We used staples. Begin with the two innermost, smallest flaps. Staple them together.

Flip it over and staple the next 2 flaps together on the other side.

Flip it back over again and repeat.

When fully stapled it will look like this...

Step 5
You have now completed one arm of your snowflake, or star. Repeat the process with 5 more sheets of square paper of the same size and then you're ready to staple, or otherwise attach, all of the arms together.

Here are 2 arms of my snowflake stapled at one tip (that will be the center of your flake) and on the adjoining sides.

This is what 4 arms looks like...

And finally...

Now hang it for display however you see fit. These are great in groups, as garland or just a single one on it's own. You can imagine how easily gorgeous paper, decorative edge scissors and some glitter can really fancy these babies up. All in natural or white with bold ribbon is lovely. My kids love folding, cutting, stapling, taping so the process AND the end result are good fun.

Enjoy the upcoming weeks during which many of us will have kidlings home from school!